
In this blog entry, we’ll look at:
- Preparing your surface
Preparing your surface
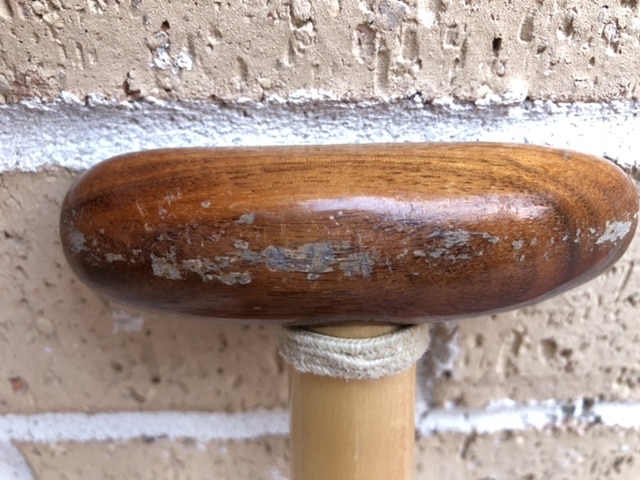
Let’s revisit the image of our damaged wood paddle. As you can see, there is a variety of “colours” in the walnut wood handle:
- The rich-looking brown which covers the majority of the handle. Here the varnish is still in great shape. It’s completely transparent, and shows the wood below in all its beauty. Varnish that most manufacturers use either have a marginal honey tone (like this Kialoa Nehu).
- The milky splotches. This is degraded, lifted varnish. This is caused by two different things: as varnish is applied, it seeps into the fibre in the wood, so it’s actually uneven on the underside. When the exposed wood soaks in water and expands, the varnish is lifted in all its uneven glory. The varnish material also deteriorates giving it that milky look. Note that varnish’s deterioration accelerates when it is exposed on both sides.
- The dull areas in the centre of the loose varnish. This is exposed wood that has weathered.
You want to remove any varnish that has loosened. Not only does it look terrible when you slop on new varnish on top, the loose varnish may also cause the new varnish to flex and come off prematurely.
There are two ways that I remove varnish. You could either use:
| Sandpaper | Knife |
|---|---|
| Safer, unless you sand yourself deliberately | Less safe if you don’t observe some basic safety principles regarding handling a knife. Sometimes freak incidents can still happen even when safety procedures are observed. |
| Better if your wood has degraded to the point where a knife could easily get under a whole layer of wood fibre. By sanding, there is little risk of taking off a whole chunk of wood. | More precise, in terms of removing all the loose varnish and none of the intact stuff, if your wood is still in good condition. By using a knife, you just remove everything that lifts, and your blade will generally meet resistance when it meets varnish that’s still gripping tightly to wood. |
| You may end up having to sand off a lot of wood in order to be sure that all loose varnish is removed. There’s a strong likelihood that you don’t remove all loose varnish | You may end up slipping your knife between layers of wood fibre and cutting off a chunk. |
My tool of choice is a knife. But here I add a disclaimer – this is my experience only, so I’m not to blame for your cuts or if you damage your paddle. And I will add that I still cut myself once in a long time.
To use a knife to remove varnish, you could use:
- The back of the blade to scrape off any large sections of loose varnish. When doing this, your metal surface should be at 90 degrees to the wood surface.
- The sharp side of the blade to remove the loose varnish that is on the edge of the damaged area. When doing this, the metal surface (your blade) should be almost parallel to the wood surface. Avoid angling your blade too steeply as this increases your chance of cutting your wood. I usually remove an extra 1mm of good varnish that is next to the milky stuff, and even more if the supposedly good varnish cuts through like butter and comes off, as this is an early indicator of loosening.
- Use some fine sandpaper (800 grit or finer) to smooth the wood once the varnish is removed.
To use sandpaper:
- For original varnish from the paddle’s manufacturer, use a rougher sandpaper (even 200 grit. I usually use 400 grit) with a harder material. Manufacturers tend to use stiffer (but more brittle) varnish because it feels nice in a shop, and it harder wearing if you never knock it against stuff. However, they crack way more easily.
- To sand down varnish from previous repairs, use a finer sandpaper with material such as garnet (it’s usually orangey-red).
- Once you’re down to the wood, change to a finer sandpaper (such as 800 grit sandpaper). Take care never to use overly hard and rough sandpaper (such as 60 or 80 grit ones) on weathered wood, as weathered wood will not stand up to harsh sanding. You’ll remove too much wood.
You’re now at a good place… wait a few days at least before taking the next step: Painting new varnish.